This is the 3rd (and last..) post about Oracle Agile 9.2.2.1 installation.
In this post we will see the Agile application node installation step by step including all Agile application required components.
The Agile Application node installation composed from the following steps:- Complete all application installation pre requisites
- Oracle Application Server 10.1.2.0.2 Installation
- Oracle Applications Server Patch
- Agile Application Installation
- Agile Viewer Installation
- Deploy Agile application on Oracle Application Server
- Verify Installation
- Configure IIS as a Proxy Server for Agile PLM
- Configure File Manager with IIS
- Verify File Manager installation
Prerequisites
1) Copy Platform directory from Disk2 to Disk1 to the setup.exe level
2) Make sure Microsoft IIS (Internet Information Services) is installed on this box.
*** It is important to install MS IIS before proceeding with the Oracle AS 10.1.2.0.2 installation, otherwise you might get into port conflict between IIS and Oracle AS 10.1.2.0.2.
Oracle Application Server 10.1.2.0.2 Installation
1) Run installer - setup.exe (from Disk1 directory)

2) Oracle Home destination:
a. Name: oracleas1
b. Path: d:\OraHome_1

3) Language: Choose the appropriate languages.

4) Check the Administrative privileges

5) At Select Configuration Options window, leave the upper 2 options checked only

6) Port configuration: Automatic

7) Fill in the Instance name and ias_admin password:

8) Install

9) Exit

10) Shutdown Oracle AS:
a. Open a cmd window
b. cd oraHome_1\bin
c. emctl stop iasconsole
d. opmnctl stopall
Oracle Applications Server Patch Installation
1) Open a cmd window
a. set ORACLE_HOME=d:\OraHome_1
b. cd [Installation Dir]\Windows\patches\oas101202\OPatch
c. opatch apply d:\ [Installation Dir]\Windows\patches\oas101202\OPatch\3992805

2) Type "Y" (for : Is this system ready …?)

Agile Application Installation
1) From Disk1: cd [Installation Dir]\Windows
2) Execute setup.exe

3) Accept the license agreement
4) Enter license & username

5) Select Applications Server + File Manager + Web Proxies

6) Location to install Agile application: D:\agile\Agile9221

7) Select Oracle Application Server 10g (10.1.2.0.2)

8) Select Standalone Installation

9) Enter Oracle Application Server Home directory: d:\OraHome_1

10) Click on Use Existing

11) Choose: No, use a Database for authentication

12) Hostname: agileapp.[domain]

13) Web Server information: agileapp.[domain]:80

14) Agile viewer information: agileapp.[domain]:5099

15) Database details:
a. Agile Database Host Name: agiledb
b. Agile Database Port: 1521
c. Agile Database SID: agile9
d. Agile Database User: agile

16) Virtual path: Agile

17) At File Manager User Authentication window select: Use Internal user account

18) File Manager Virtual Path: Filemgr

19) Agile File Manager window: agileapp.[domain]:80

20) Agile File Manager Storage Location: e:\agile\agile9221\files

21) Select to create product icons in an new Program Group called: Agile

22) Install…

23) Restart the system
Agile Viewer Installation
1) From Agile Viewer installation directory execute: setup_win.exe

2) Accept the license agreement
3) Enter User name and License key
4) Check the Agile Viewer only

5) Select New Install

6) Location: d:\Agile\Agile9221

7) Select Regular Agile Viewer

8) Enter hostname & port: agileapp.[domain]:5099

9) Done

Deploy Agile application on Oracle Application Server
1) cd OraHome_1\opmn\bin
a. Stop all Oracle AS processes - opmnctl stopall
b. Start all Oracle AS processes - opmnctl startall
c. cd d:\agile\agile9221\agileDomain\bin
d. Execute command: DeployAgile

2) Verify deployment
a. cd \OraHome1\dcm\bin
b. dmctl listapplications

Verify Installation
1) Run in browser the following url: http://agileapp:7777/Agile/PLMServlet
2) Connect with admin user
Configure IIS as a Proxy Server for Agile PLM
1) Navigate to: Control Panel -> Administrative tools -> Internet Information Services (IIS) Manager

2) Right click on “Default Web Site” (under Web Sites) -> properties
3) Select the “Home Directory” tab
4) In the “Execute permissions” list, select “scripts and executables”

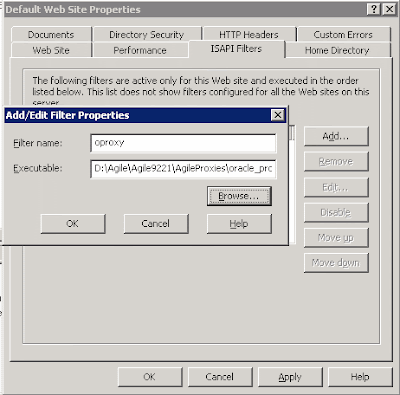
5) Select the “ISPAI filter” tab -> add
a. Filter Name: oproxy
b. Executable: D:\Agile\Agile9221\AgileProxies\oracle_proxy.dll
6) Right click on Default Web Site-> new -> Virtual directory

7) Alias: oproxy

8) Path: d:\agile\agile9221\AgileProxies

9) Check the read and execute options

10) Finish.
11) Navigate to “Web service extension” -> select: “all unknown ISAPI extensions and Click “Allow”

12) Navigate to: Control Panel -> Administrative tools -> Services
13) Restart the “IIS Admin Service”
14) Run in browser: http://agileapp/Agile/PLMServlet (without port 7777)
15) Logon with admin user to verify IIS configuration.
Configure File Manager with IIS
1) Edit d:\agile\agile9221\Tomcat\conf\server.xml
2) Look for the port after the following text:
!-- Define a Coyote/JK2 AJP 1.3 Connector on port 8009 --
3) Edit file jk2.properties -> channelSocket.port=8009 (the previous port)
4) Navigate to: Control Panel -> Administrative tools -> IIS Manager
5) Go to ISPAI Filter tab -> add
a. name: Jakarta IIS Connector
b. Executable: D:\Agile\Agile9221\AgileProxies\isapi_redirect.dll
6) Right click on default web site-> new -> Virtual directory
a. Alias : Jakarta
b. Path: d:\agile\agile9221\agileproxies
7) Check the read and executable options
8) Restart IIS Admin Service again.
Verify File Manager installation
1) Startup tomcat server by: d:\agile\agile9221\tomcat\bin\catalina start
2) Open the following url in browser to check Java installation on client: http://agileapp/JavaClient/start.html

3) In order to use the Agile java client we should install Java JRE 1.5.x
4) Open the following url again: http://agileapp/JavaClient/start.html
5) Click on Launch
6) Login with admin user.
7) Navigate to: Server setting -> locations
Verify all locations (especially under the File Manager tab)
Now when the Agile application node installed, the Agile system are ready for use.
If you have an initial dump file to export, you can do it now with agile9imp.bat script.
In this post we will see the Agile application node installation step by step including all Agile application required components.
The Agile Application node installation composed from the following steps:- Complete all application installation pre requisites
- Oracle Application Server 10.1.2.0.2 Installation
- Oracle Applications Server Patch
- Agile Application Installation
- Agile Viewer Installation
- Deploy Agile application on Oracle Application Server
- Verify Installation
- Configure IIS as a Proxy Server for Agile PLM
- Configure File Manager with IIS
- Verify File Manager installation
Prerequisites
1) Copy Platform directory from Disk2 to Disk1 to the setup.exe level
2) Make sure Microsoft IIS (Internet Information Services) is installed on this box.
*** It is important to install MS IIS before proceeding with the Oracle AS 10.1.2.0.2 installation, otherwise you might get into port conflict between IIS and Oracle AS 10.1.2.0.2.
Oracle Application Server 10.1.2.0.2 Installation
1) Run installer - setup.exe (from Disk1 directory)

2) Oracle Home destination:
a. Name: oracleas1
b. Path: d:\OraHome_1

3) Language: Choose the appropriate languages.

4) Check the Administrative privileges

5) At Select Configuration Options window, leave the upper 2 options checked only

6) Port configuration: Automatic

7) Fill in the Instance name and ias_admin password:

8) Install

9) Exit

10) Shutdown Oracle AS:
a. Open a cmd window
b. cd oraHome_1\bin
c. emctl stop iasconsole
d. opmnctl stopall
Oracle Applications Server Patch Installation
1) Open a cmd window
a. set ORACLE_HOME=d:\OraHome_1
b. cd [Installation Dir]\Windows\patches\oas101202\OPatch
c. opatch apply d:\ [Installation Dir]\Windows\patches\oas101202\OPatch\3992805

2) Type "Y" (for : Is this system ready …?)

Agile Application Installation
1) From Disk1: cd [Installation Dir]\Windows
2) Execute setup.exe

3) Accept the license agreement
4) Enter license & username

5) Select Applications Server + File Manager + Web Proxies

6) Location to install Agile application: D:\agile\Agile9221

7) Select Oracle Application Server 10g (10.1.2.0.2)

8) Select Standalone Installation

9) Enter Oracle Application Server Home directory: d:\OraHome_1

10) Click on Use Existing

11) Choose: No, use a Database for authentication

12) Hostname: agileapp.[domain]

13) Web Server information: agileapp.[domain]:80

14) Agile viewer information: agileapp.[domain]:5099

15) Database details:
a. Agile Database Host Name: agiledb
b. Agile Database Port: 1521
c. Agile Database SID: agile9
d. Agile Database User: agile

16) Virtual path: Agile

17) At File Manager User Authentication window select: Use Internal user account

18) File Manager Virtual Path: Filemgr

19) Agile File Manager window: agileapp.[domain]:80

20) Agile File Manager Storage Location: e:\agile\agile9221\files

21) Select to create product icons in an new Program Group called: Agile

22) Install…

23) Restart the system
Agile Viewer Installation
1) From Agile Viewer installation directory execute: setup_win.exe

2) Accept the license agreement
3) Enter User name and License key
4) Check the Agile Viewer only

5) Select New Install

6) Location: d:\Agile\Agile9221

7) Select Regular Agile Viewer

8) Enter hostname & port: agileapp.[domain]:5099

9) Done

Deploy Agile application on Oracle Application Server
1) cd OraHome_1\opmn\bin
a. Stop all Oracle AS processes - opmnctl stopall
b. Start all Oracle AS processes - opmnctl startall
c. cd d:\agile\agile9221\agileDomain\bin
d. Execute command: DeployAgile

2) Verify deployment
a. cd \OraHome1\dcm\bin
b. dmctl listapplications

Verify Installation
1) Run in browser the following url: http://agileapp:7777/Agile/PLMServlet
2) Connect with admin user
Configure IIS as a Proxy Server for Agile PLM
1) Navigate to: Control Panel -> Administrative tools -> Internet Information Services (IIS) Manager

2) Right click on “Default Web Site” (under Web Sites) -> properties
3) Select the “Home Directory” tab
4) In the “Execute permissions” list, select “scripts and executables”

5) Select the “ISPAI filter” tab -> add
a. Filter Name: oproxy
b. Executable: D:\Agile\Agile9221\AgileProxies\oracle_proxy.dll

6) Right click on Default Web Site-> new -> Virtual directory

7) Alias: oproxy

8) Path: d:\agile\agile9221\AgileProxies

9) Check the read and execute options

10) Finish.
11) Navigate to “Web service extension” -> select: “all unknown ISAPI extensions and Click “Allow”

12) Navigate to: Control Panel -> Administrative tools -> Services
13) Restart the “IIS Admin Service”
14) Run in browser: http://agileapp/Agile/PLMServlet (without port 7777)
15) Logon with admin user to verify IIS configuration.
Configure File Manager with IIS
1) Edit d:\agile\agile9221\Tomcat\conf\server.xml
2) Look for the port after the following text:
!-- Define a Coyote/JK2 AJP 1.3 Connector on port 8009 --
3) Edit file jk2.properties -> channelSocket.port=8009 (the previous port)
4) Navigate to: Control Panel -> Administrative tools -> IIS Manager
5) Go to ISPAI Filter tab -> add
a. name: Jakarta IIS Connector
b. Executable: D:\Agile\Agile9221\AgileProxies\isapi_redirect.dll
6) Right click on default web site-> new -> Virtual directory
a. Alias : Jakarta
b. Path: d:\agile\agile9221\agileproxies
7) Check the read and executable options
8) Restart IIS Admin Service again.
Verify File Manager installation
1) Startup tomcat server by: d:\agile\agile9221\tomcat\bin\catalina start
2) Open the following url in browser to check Java installation on client: http://agileapp/JavaClient/start.html

3) In order to use the Agile java client we should install Java JRE 1.5.x
4) Open the following url again: http://agileapp/JavaClient/start.html
5) Click on Launch
6) Login with admin user.
7) Navigate to: Server setting -> locations
Verify all locations (especially under the File Manager tab)
Now when the Agile application node installed, the Agile system are ready for use.
If you have an initial dump file to export, you can do it now with agile9imp.bat script.


No comments:
Post a Comment